
Most people who need floor plans are planning an extension, a renovation, or a refurbishment. Their architect has told them they need accurate drawings, and they’re wondering: can I just draw these myself?
The short answer is yes, you can try to draw your own floor plans. But whether you should depends entirely on what you need them for.
- For furniture planning, room layouts, or sketching initial concepts before speaking to an architect, a DIY floor plan works fine.
- For planning applications, building control submissions, Land Registry compliance, HMO licensing, or fire safety assessments? That’s a different situation entirely.
Here’s what most people miss. Trying to save £1,000 by attempting a DIY survey can cost you 10 to 100 times that saving if measurements are inaccurate and the errors go unnoticed to the later stages of a build.
And those errors almost always go unnoticed. In over 20 years of professional surveying, not a single client has come to us having tried DIY first. It’s essentially unheard of in the industry to attempt your own measurements ahead of any kind of construction project. There’s a reason for that – it’s a terrible idea.
One more thing worth knowing. Even new-build properties deviate from their original design drawings. A building is never constructed to exact specifications drawn by the original architect, and modifications happen during construction, and over time post-construction. So copying or using the original architect’s plans is not the shortcut it seems.
The bottom line? DIY floor plans are perfectly fine for personal use. But if accuracy has legal, financial, or safety consequences, you need a professional.
Where to Get Accurate, Up-to-Date Plans
The best way to get a set of accurate plans of the building as it stands today is to commission a measured building survey.
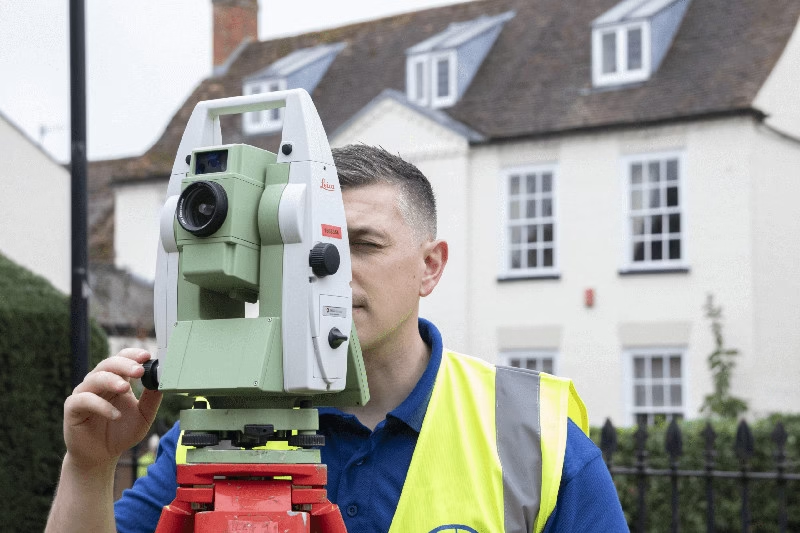
Professional surveyors use 3D laser scanning equipment that captures every room, wall, window, door, and structural feature to within +/- 15 millimetres. The output is a complete set of scaled floor plans, elevations, and sections, delivered as CAD drawings or PDF, ready for your architect or builder to work from.
Why does this matter? Because a measured survey captures your property as it actually is right now. Not as the architect originally designed it. Not as it was before the previous owner knocked through a wall or added a conservatory. The building as it stands, measured to millimetre precision.
For a typical 3-bedroom semi-detached house, a survey costs circa £1,200 including floor plans, elevations, and a topographical survey. Deliverables are usually issued within 5 working days.
If your project involves a planning application, building control, or any kind of construction work, this is the route to take. The guide below assumes you don’t have professional laser measuring equipment so it’s for personal use only.
Need Accurate Floor Plans?
Get a no-obligation quote for a professional measured building survey from our experienced team.
What You Need Before You Start Drawing Your Own Plans
Equipment for Hand-Drawn Floor Plans
You don’t need much to draw a basic floor plan by hand:
- Graph paper (5mm grid works well for metric scale)
- Tape measure (minimum 5m, ideally an 8m laser measure for longer runs)
- Ruler and set square for straight lines and right angles
- Pencil and eraser (use a fine-tip pen for final lines)
- Clipboard for on-site notes
Software and Apps for Digital Floor Plans
If you prefer working digitally, there are free tools available to UK users:
- Floorplanner (free tier, browser-based, metric support)
- MagicPlan (smartphone app, uses your phone camera to capture room dimensions)
- SketchUp Free (browser-based 3D modelling with a learning curve)
A word of caution: most of these apps bury a disclaimer in their terms and conditions stating that measurements may not be accurate and that they accept no liability for damages resulting from errors. If the app maker won’t stand behind the accuracy of their own product, you shouldn’t be relying on it for anything beyond personal layouts and concept sketches. Don’t use apps as a shortcut where professional drawings are needed.
Whatever tool you use, make sure it supports metric measurements. That’s what we use in the UK. Some US-built apps default to imperial, so check your settings before you start measuring.
How to Draw Your Own Floor Plan Step by Step (for Personal Use)

Step 1: Measure the Property
Start with the overall external dimensions if you can access all sides of the building. Then measure each room individually: length, width, and floor-to-ceiling height.
Don’t forget wall thickness. This is the single most common error on DIY floor plans. Plans must show walls with their actual thickness, not as single lines.
Record door and window positions: distance from the nearest corner, width of the opening, and direction of swing. Note fixed features like built-in cupboards, fireplaces, boilers, radiators, and soil stacks.
Measure twice from different starting points and cross-check your figures. Professional surveyors use redundant measurements to catch errors. You should do the same.
Step 2: Choose Your Scale
For most floor plans, use 1:50 (1cm on paper = 50cm in real life) or 1:100.
For floor plans, use 1:50 or 1:100.
Always state the scale on the drawing and include a scale bar.
Step 3: Draw the Layout
Work in this order:
- Start with external walls (show wall thickness)
- Add internal walls and partitions
- Draw door openings with swing arcs
- Add windows (show opening direction where relevant)
- Include staircases with an arrow indicating direction of ascent
Step 4: Add Dimensions, Labels, and Annotations
Every room needs a length and width dimension. Label each room with its use: bedroom 1, kitchen, bathroom, and so on.
Then add these essential elements:
- North arrow
- Scale and scale bar
- Paper size and drawing number
- If for planning: label every drawing as “existing” or “proposed”
- Mark any walls or features to be demolished
UK Planning Permission: What Your Floor Plan Must Include
This is where most DIY floor plans fall short where homeowners attempt making their own for construction projects. Local planning authorities have specific validation requirements, and plans that don’t meet them are rejected before anyone even considers the merits of your proposal.
Mandatory Elements for a Valid Planning Application
Your floor plan must include all of the following:
- Metric scale (1:50 or 1:100 for floor plans)
- A scale bar on every drawing
- A north arrow
- Paper size and drawing number stated
- Room uses clearly labelled
- Walls shown with thickness, not single lines
- Doors and windows in identical positions on both floor plans and elevation drawings
- Items to be demolished clearly highlighted
One critical point: statements like “Do not scale” or “Not to scale” render applications invalid at the validation stage.
Source: Braintree District Council
What Gets Your Application Rejected
Validation-stage rejections happen immediately. These are the errors that get your application sent straight back without anyone even looking at the planned construction:
- Unrecognised or missing scale
- Missing north point
- Out-of-date OS map for the site location plan
- Site boundary not outlined in red
- Drawings not labelled (e.g. “existing first floor plan”)
Consistency errors are another common cause. If a door appears in one position on the floor plan but a different position on the elevation drawing, the application is rejected.
Source: Lambeth Council
Most planning applications that get rejected by the council are rejected because of issues with the drawings, rather than with what’s actually being proposed, according to Harper Latter Architects. That tells you how fussy planning authorities are and how flawless your plans need to be.
Common Mistakes That Ruin DIY Floor Plans
Measurement Errors
- Not measuring wall thickness (the most common DIY mistake by far)
- Forgetting recesses, alcoves, and chimney breasts
- Rounding measurements instead of recording exact figures
- Not cross-checking from multiple reference points
Drawing and Labelling Errors
- Using single lines for walls instead of showing thickness
- Missing labels: room names, floor levels, door swing direction
- Inconsistency between floor plan and elevation drawings
- Missing north arrow or scale bar
- Not distinguishing between existing and proposed layouts
Regulatory Blind Spots
Beyond the risk of measurement errors, there’s another reason DIY floor plans don’t work ahead of a construction project: regulations change constantly, and most homeowners don’t know what their plans need to comply with.
Building regulations don’t only apply to new builds. They also cover extensions, conversions, and change of use.
The Future Homes Standard takes full legal effect on 24 March 2027 for all new homes in England, with tighter energy efficiency and ventilation requirements under Parts L and F of the Building Regulations. Transitional arrangements allow building under previous standards where building control documents were submitted before 24 March 2027 and construction commences before 24 March 2028. Separately, the Nationally Described Space Standard sets minimum floor areas where adopted by local authorities. For example, a 1-bed, 2-person flat must be at least 50 sqm on a single storey, with a minimum of 1.5 sqm of built-in storage. Check whether your local authority applies these standards.
Source: GOV.UK: Nationally Described Space Standard; The Building Regulations etc. (Amendment) (England) Regulations 2026
Always check your local authority’s specific requirements. They may vary.
In over 20 years of surveying, none of our projects have involved correcting or re-surveying properties where the client initially tried to measure up themselves first. It simply doesn’t happen. Nobody in the industry attempts DIY measurements ahead of a construction project.
That should tell you everything. If professional surveyors exist for a reason, it’s because accuracy at this stage matters more than at almost any other point in a build. Get this wrong and nobody catches it until the kitchen doesn’t fit, the extension fails building control, or the planning application comes back rejected.
When to Hire a Professional Surveyor Instead
If accuracy has legal, financial, or safety consequences, hire a professional.
If you do not instruct a professional to do a professional job, you are asking for trouble.
For Land Registry compliance, lease plans, HMO licensing, and fire safety assessments, you must submit plans that meet prescribed standards of accuracy and presentation. For Land Registry, plans must be drawn accurately to a recognised scale; hand-drawn sketches are not accepted. For HMO licensing, plans must show room dimensions and layouts clearly enough to demonstrate compliance. In practice, meeting these standards almost always requires a professional survey. It’s also strongly recommended for planning applications, building control submissions, and any extension or renovation involving structural work.
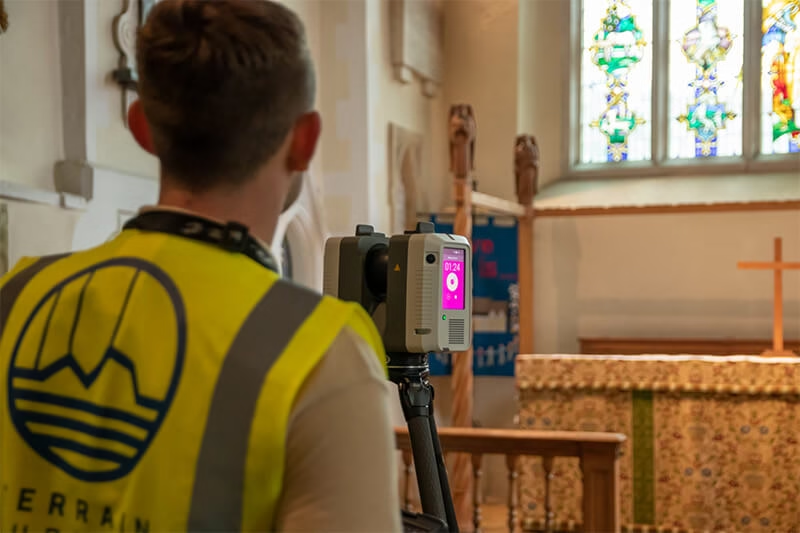
The accuracy difference is significant. Professional surveys use laser scanners and robotic total stations for millimetre precision. DIY plans are approximate at best.
What does it cost? For a typical 3-bedroom semi-detached house, you’re looking at circa £1,200 for a topographical survey, floor plans, and elevations. If you need a higher level of detail (sockets and switches, reflective ceiling plans, sections) the price increases. You could opt for basic plans only, although on a small project the cost reduction is often not worth the amount of detail you sacrifice.
Don’t Leave It Until the Last Minute Either
We’ve seen projects where the need for a proper survey was overlooked until the planning application deadline was looming. The client hadn’t allowed time to get professional plans drawn up, missed the submission window, and had to resubmit at a later date. That meant additional fees and, more importantly, delayed the entire project.
The turnaround on a professional survey is faster than most people expect. For a typical 4-bed detached house, we’re on site for 3 to 4 hours. We process the scan data within a day of leaving site, and after senior quality checks, the drawing team produces the full deliverable suite in around 3 working days. Start to finish, we generally issue final deliverables within 5 working days.
Get the survey booked early in your project timeline. It’s one of the first things you should arrange, not the last.
How to verify your surveyor: check The Survey Association website for affiliated and accredited survey companies. The survey is the foundation of your project. If you cut corners here, you risk expensive mistakes further down the line.

Terrain Surveys is accredited by ISO 9001, Constructionline Gold, CICES, TSA, CSCS, and Acclaim.
Drawing Your Own Floor Plan: The Bottom Line
DIY floor plans make sense for personal use, furniture planning, and initial design concepts.
For anything involving planning permission, building control, legal compliance, or construction, the stakes are too high for guesswork.
DIY measurements simply do not work for professional purposes. If they did, there wouldn’t be a need for surveyors.
The cost of getting it right first time is always less than the cost of getting it wrong.
If you’re planning a project that needs accurate floor plans, speak to a professional surveyor before committing to DIY. Get a professional measured survey you can rely on.
Need Accurate Floor Plans?
Get a no-obligation quote for a professional measured building survey from our experienced team.
Get a free, no-obligation quote from Terrain Surveys. Call +44(0)143 884 1300 or request a quote.


